User:Shardsofblue/Needle Lace


Needle lace (also known as needlelace or needle-made lace) is a type of lace created using a needle and thread to stitch up hundreds of small stitches to form the lace itself. It is also used to create the fillings or insertions in cutwork.
Technique
[edit]Overview
[edit]In its purest form the only equipment and materials used are a needle, thread and scissors. This form of lace making originated in Armenia where there is evidence of a lace making tradition dating back to the pre-christian era.
Beginning in the 17th century in Italy, a variety of styles developed where the work is started by securing heavier guiding threads onto a stiff background (such as thick paper) with stitches that can later be removed. The work is then built up using a variety of stitches - the most basic being a variety of buttonhole or blanket stitch. When the entire area is covered with the stitching, the stay-stitches are released and the lace comes away from the paper (see reticella).
This method was later adapted to make use of inexpensive cloths (such as muslin) as a backing. The muslin can be pinned to a pillow (such as the type used in bobbin lace) or stretched across an embroidery hoop to create the required stiffness.
Step by Step
[edit]The following is a step by step example of one modern method of creating needle lace.
| Making Needle Lace |
|---|
| 1. Choose a simple line-drawn pattern and ink it onto an inexpensive, non-textured piece of cloth, such as muslin. The appearance of the cloth is of no consequence, as you will be removing the lace from the cloth when it is finished. Only be sure you can clearly see your design. |
| 2. Stretch the cloth across an embroidery hoop so that your design shows clearly in the center. |
| 3. Select a thread which is approximately 4 times thicker than the thread you plan to use for the filling stitches. This thread will be used to outline your pattern and provide an anchor for your stitches. The color does not matter, as it will be covered with a finer thread later. |
| 4. Tack down the outline thread with a thin thread (the tacking thread should be the same thickness as the filling thread), tacking it down at regular intervals. Place the tacks only as close as they need to be to maintain the shape of the outline; remember that you will be applying tension between the outline threads later, which will distort your image if you have not tacked the outline thread with this in mind. You will not puncture the cloth again during this project. |
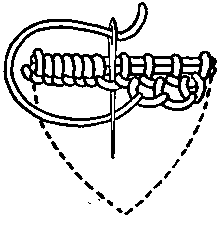
| 5. Now you can begin stitching. Anchor your filling thread by drawing it parallel to a section of your outline thread, between the outline thread and its anchor thread. Then begin a row of detatched buttonhole stitches across the top of the outline thread without puncturing the material. Do not pull them tight, but leave a small row of loops. At the end of the row, wind the thread once around the outline thread to bring it down to the next row. This row is now the "outline thread" for the next row. |
| 6. Progress back along your first row with another row of button hole stitches, using the loops you left in your first row as anchors for the next one. Only place one stitch in each loop. Continue in this vein until the open area is filled with buttonhole stitches, then move on to the next open area.
Variations of stitch can be obtained by varying the width of the buttonhole and the number of stitches placed in each loop. It is advisable to only place one type of stitch in each open section of the pattern. |
| 7. Once all the open areas are filled with buttonholes, cover the outline thread with a close buttonhole stitch to provide a finished look. Again, do not puncture the material. |
| 8. The only threads which should have punctured the cloth are the tacking stitches from step 4. Snip these stitches carefully away from the back of the cloth and lift the completed piece of lace away from its pattern. |
History
[edit]Related Articles
[edit]References
[edit]- "Structures of Antique Lace". A collection of Antique Laces. Retrieved July 26, 2005.

